Hi All!
It's Jenn from
Crayons and Cuties In Kindergarten and I am here today with some 'DIY' goodies for your classroom that are not going to kill your
very depleted wallet! Grab your scissors, tape and ribbon...we are about to have some fun!
I know many of you are already in school and sweating out the 'beginning of the year' crazies...that will be me in one short week!
So I have been busy getting my classroom ready and new goodies prepped for a year of fun!
Teachers are NOTORIOUS for creating something new from something 'old' and/or out of ABSOLUTE necessity!
My mom used to always say, 'Necessity is the mother of invention.'
I never really understood her phrase...now as a teacher and mom I do!
So today I am here to show you two teacher 'hacks' I will be using in my classroom this year!
I found the idea about cutting notebooks in half on Pinterest- but added a little twist- which I will get to in a bit!
First for 'how to' on the books:
Well I am happy to report that I am typing this post with ALL 10 FINGERS after this 'project!'
My hubby didn't mind breaking out all his 'man tools' to help me out with a few projects for this school year- one of which was chopping these 50 cent notebooks into 2 for me!
I had read Home Depot will cut them for you, but didn't want to 'deny' my hubby the chance to help!
We did find that the best way to cut them was with the 'open part' of the book facing toward you.
I have also read that if you don't have access to power tools OR a Home Depot, you can open the books and use a heavy duty paper cutter to slice them in two.
So now I had 50 notebooks for the price of 25!
WHY cut them in half?
Because I find my kindergartners never use the whole page and I felt like so much of the notebooks were being wasted!
Now we will have a math journal (plenty of room for our simple & quick responses/entries) and a readers/writers notebook. (I will still have a FULL notebook for each child to use as a writing journal).
The Readers/Writers notebook will be used for:
*responses to books we listened to/read on our own
*practicing letters/words
*responses to mini lessons
*recording in our notebook what the class is doing whole group during interactive writing
*small group reading group responses
We can even take it outside with us to record what we see during science!
Now to the 'twist' that I am so excited about!
Last year we lost our full-time teaching assistants due to budget cuts.
It was a HUGE adjustment for me since I have always had a full time aide.
One of the things that was hard was making sure EVERYONE was on the right page but without losing anyone to 'the sillies' as I walked around!
I would always say 'Go to the next blank page' BUT....it didn't always work out so well!
As I was reading a book with my sons this summer that had ribbons as place markers in the book, the idea came to me! Add a ribbon 'place marker' to the notebooks!!
So here is how...
I bought a spool of thicker/heavier ribbon at the craft store and found that 10 inches will be perfect for the mini books (if you are doing this on a full size book, just double everything I have measured!)
To make sure the ribbon stays all year with all the tugging it will get, I used 'Gorilla Tape' duct tape! I measured a 4 inch piece and put the ribbon about half way down.
Next- place the tape/ribbon combo onto the spine of the book making sure the tape lines up with the top of the book and then fold it around to secure it.
Because I am using 2 mini books, I wanted to color-code my books so the students can easily find the one we need ('Go get your yellow book.'). I added a piece of colored masking tape (found at Michaeals) on top of the black gorilla tape.
SO NOW....
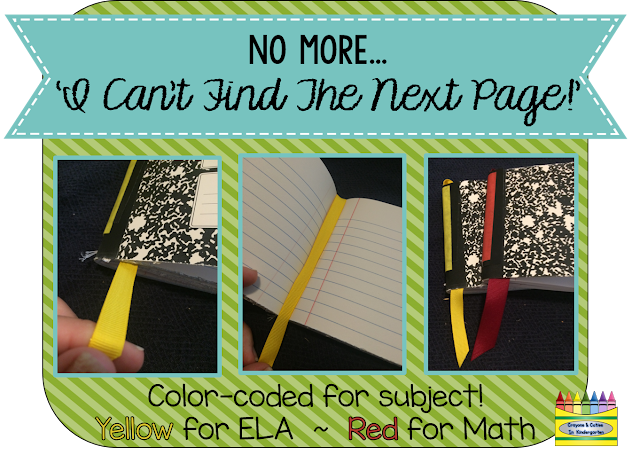
The ribbon will help them find where they 'left off' in their book so that we are all ready for the next day!
Now if you are like me, you are going to pin one of the images and say 'oh I'll remember that' and then look back at your Pinterest board and say 'What was that again?' So I made this quick reference image for you! Simply pin this one and it'll automatically refresh your brain!
So now where am I going to keep these notebooks...along with their journals, Fundations workbooks, writing folders, etc.?!
I had ALWAYS had buckets with all these things and my TA and I would hand them out...well...it was just me last year and I felt like I wasted more time than I should have just handing out materials. So this year I was determined to come up with a system to make the kids more independent.
Earlier in the summer I saw a post about Dollar Tree having cardboard magazine file boxes..but since I didn't need them until August, I put off ordering them.
WELL...guess what...they are OUT OF STOCK now!
So I searched other retail office supply stores and they are REALLY expensive (upwards of $2-$5 each!!)...and my wallet is pretty drained from a summer of no paycheck and fun!
It got me thinking....and as I ate my cereal just the other day I was staring at the box and the light bulb came on!
I got to work...it literally only took me TOPS 5 minutes to make one...and that is with me 'figuring out' the measurements!
You are going to need to make sure you have a box that holds at least 17oz of cereal...the smaller 11.5oz box wasn't tall or wide enough!
Here is my 'how to':
4.5 inches gives a good base so that nothing falls out or 'tips' the box!
Starting at the mark you made at 4.5 inches, use a ruler to make a diagonal line across to the opposite top corner of the box.
Next is to trim off the 'flaps' on top BUT don't forget to save your box tops!
AND look at this FABULOUS box top container I have thanks to Primary Pack's own
Mrs. Payton!
This was probably the trickiest part...cut down from the top of the box to the 4.5 inch marking on both sides. Trim a bit off but keep some so that you can fold the excess into the box. This will help keep it sturdy and give it more power to combat the abuse it will endure during the year!
Next, score the diagonal lines you made using a scissor- this will make them easier to fold!
You cut just cut those parts off, but by folding them in you are giving the box more strength!
And then secure all the folded parts inside the box using packing tape.
To personalize the box, simply peel/stick a 2x4 shipping label to the front! It will fit perfect! You can even first personalize them on your computer (just remember to change the text sideways) if you want a more 'professional' look!
Now the once cereal box is ready to...
OR...
ONE problem...how am I going to eat 20+ boxes of cereal?
So I am going to send this note home the first week of school:
(
click to download a copy)
We won't need the boxes the first week, so I can gather them from parents and work on getting them all ready for the next few weeks as I introduce how to use the books and how to care for our supplies!
Wishing everyone as wonderful 2015-2016 school year!
Until next post,

 Please help us welcome Jessica from Mrs. Stanford's Class, Chad from Male Kindergarten Teacher, Elissa from Mrs. Jones' Creation Station, and Jennifer from Everything Just So. If you've never been to their blogs, make sure to follow them when you stop by during the blog hop! Let's get started!


